|
【Ubuntu ISO 光碟映像下載】
Ubuntu 官方網站:http://www.ubuntu.com/
Ubuntu 正體中文官方網站:http://www.ubuntu-tw.org
台灣這邊幾個 Mirrors:
國家高速網路與計算中心:http://ftp.twaren.net/Linux/Ubuntu/
義守大學:http://ftp.isu.edu.tw/pub/Linux/Ubuntu/releases/
元智資訊工程學系:http://ftp.cse.yzu.edu.tw/pub/Ubuntu/
靜宜大學資訊學院:http://ftp.cs.pu.edu.tw/Linux/Ubuntu/
國研院國網中心自由軟體實驗室:http://free.nchc.org.tw/ubuntu-cd/
Ubuntu 按鍵組合
Ctrl+Alt+F1(终端1)
Ctrl+Alt+F2(终端2)
Ctrl+Alt+F3(终端3)
Ctrl+Alt+F4(终端4)
Ctrl+Alt+F5(终端5)
Ctrl+Alt+F6(终端6)
Ctrl+Alt+F7(X-window界面)
|
|
|
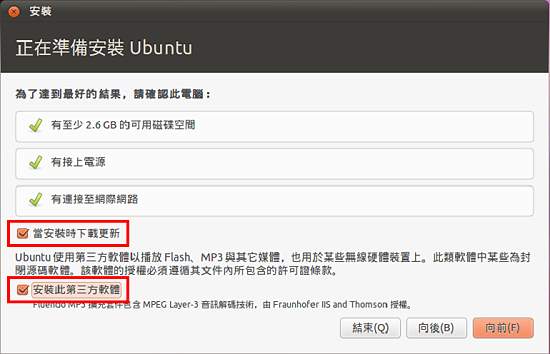
【Ubuntu 10.10 Desktop 安裝】
放入剛剛下載的光碟進行安裝,依步驟按壓【向前】就可安裝
首先的注意事項:
很簡單就可安裝完成,然後重開機
使用剛剛所設定的帳號登入
更改電腦 IP:
【系統】→【管理】→【網路工具】→【裝置】→【網路裝置】→【乙太網路介面(eth0)】→【設定】
點選【Auto eth0】→【編輯】
→【IPv4 設定】→【方法(M)】→ 選擇【手動】
→ 點選【加入】→【輸入靜態IP】
關閉【網路工具】
重新啟動網路
~$ sudo /etc/init.d/networking restart
手動編輯網路IP
vi /etc/network/interfaces
auto eth0
iface eth0 inet static
address 10.2.2.91
netmask 255.255.255.0
gateway 10.2.2.254
|
更改電腦名稱:
~$ sudo -s
~# vi /etc/hostname
~# vi /etc/hosts
~$ /etc/init.d/hostname.sh
重新啟動
# hostname
驗證是否已經修改完畢。
更改 DNS Server
~$ vi /etc/resolv.conf
更新系統
~$ sudo apt-get clean && sudo apt-get update && sudo apt-get upgrade
|
|
|
【Ubuntu 11.04 Server 安裝】
放入剛剛下載的光碟進行安裝,依步驟按壓【向前】就可安裝
啟用 gnome x-window 讓 Ubuntu Server 有桌面圖形介面
安裝前請
先更新系統
安裝 Ubuntu 桌面環境套件
sudo apt-get install ubuntu-desktop
啟用 Gnome Desktop Manager and XServer
sudo /etc/init.d/gdm start
sudo dpkg-reconfigure xserver-xorg
安裝 VNC Server
sudo apt-get install vnc4server
啟用 VNC Server
vncserver :1 -geometry 1024x768 -depth 16 -pixelformat rgb565
停用Ununtu x window 桌面圖形介面
按 Ctrl+Alt+F1 到命令列模式
~$ sudo /etc/init.d/gdm stop
或
~$ sudo service gdm stop
啟用Ununtu x window 桌面圖形介面
~$ sudo /etc/init.d/gdm start
或
~$ sudo service gdm start
|
|
|
【APT套件庫安裝/查詢∕更換 Mirror Site】
取得套件訊息
~$ apt-cache show 套件名稱
安裝套件
~$ sudo apt-get install 套件名稱
移除套件
~$ sudo apt-get remove 套件名稱
清除沒有用到的套件
~$ sudo apt-get clean && sudo apt-get autoclean 套件名稱
檢查與重建套件相依關系
~$ sudo apt-get check
APT-GET 查詢已安裝套件
~$ dpkg -l
更換 Mirror Site
編輯 /etc/apt/sources.list
sudo vi /etc/apt/sources.list
將全部 tw.archive.ubuntu.com 都取代成 free.nchc.org.tw
|
|
|
|
【將中文目錄名稱還原為英文目錄名稱】
裝完 Ubuntu 會發現目錄都是中文,在 Gnome-Terminal 終端機命令底下切換很麻煩。
【系統】→【管理】→【語言支援】→ 增加「英語」支援
方式二:
終端機命令列輸入:
~$ export LANG=en_US
~$ xdg-user-dirs-gtk-update
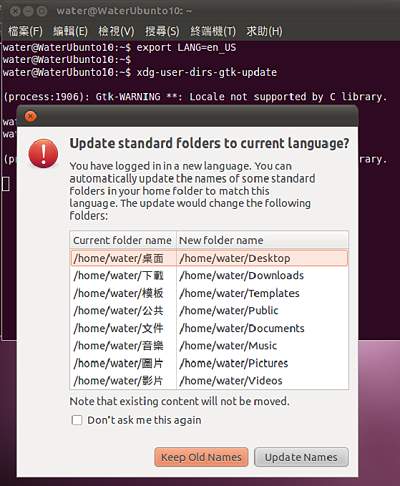
點選 Update Names 做會把所有中文目錄名稱更改為英文目錄名稱
~$
export LANG=zh_TW
重開機
~$ sudo reboot
重開機登入後會詢問,請先勾選【不要問我這個問題】再點選【保留舊名稱】
|
|
|
【設定∕改變∕啟用 Ubuntu root 密碼】
保留在 sudo 模式
~$ sudo -s
啟用 root 的密碼
~$ sudo passwd root
關閉 root 帳號
~$ sudo passwd -l root
|
|
|
【sudo 不用輸入密碼】
首先使用 root 的權限
~$ sudo gedit /etc/sudoers
將最後一行的
%admin ALL=(ALL) ALL
改成
%admin ALL=(ALL) NOPASSWD: NOPASSWD: ALL
存檔退出,即可。
|
|
|
|
【將最小化、最大化、關閉按鈕放到右邊】
不習慣最小化、最大化、關閉按鈕在左邊。
把他換到右邊
~$ gconftool-2 --set /apps/metacity/general/button_layout --type string "menu:minimize,maximize,close"
恢復到左邊:
~$ gconftool-2 --set /apps/metacity/general/button_layout --type string "maximize,minimize,close:menu"
|
|
|
【使用 SCIM 輸入法整合器】
用不習慣預設的 ibus 輸入法整合器。
安裝 SCIM 輸入法整合器
~$ sudo apt-get install scim scim-chewing scim-tables-zh && sudo im-switch -s scim-bridge
|
|
|
【vi 編輯器問題】
當使用終端機會發現vi的上下左右鍵有問題,原來他是用舊版的 vi 不是新版的 vim。
安裝 vim
~$ sudo apt-get install vim
改變 link
~$ sudo update-alternatives --config vi
選擇 /usr/bin/vim.basic
|
|
|
【讓文字編輯器 gedit 認識 BIG5 中文碼】
發現 gedit 顯示 Big5 都是亂碼
修正它:
~$ gconftool-2 -s /apps/gedit-2/preferences/encodings/auto_detected --type list
--list-type string '[UTF-8,BIG5,BIG5-HKSCS,EUC-TW,CURRENT,ISO-8859-15,UTF-16]'
|
|
|
【顯示系統工具與組態編輯器】
【系統】→【偏好設定】→【主選單】→【系統工具】
勾選你所需要的功能::
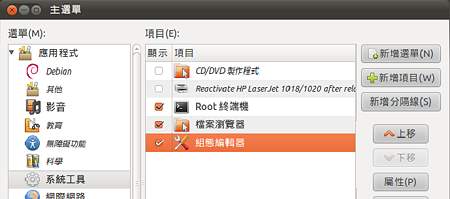
按【關閉】按鈕後會再【應用程式】欄看到增加【系統工具】
|
|
|
【Ubuntu 桌面顯示垃圾桶、我的電腦、網路】
剛安裝完 Ubuntu 會覺得桌面空空的,還是習慣 Windows XP 的桌面圖示例如:我的電腦、垃圾桶等等。
顯示方法一:使用桌面功能
【應用程式】→【系統工具】→【組態編輯器】→【/apps/nautilus/desktop】
勾選要顯示到桌面的圖示

顯示方法二:使用終端機命令
##檔案管理員會出現網址列
gconftool-2 --set /apps/nautilus/preferences/always_use_location_entry --type
bool 1
##可以看到桌面的網路圖示
gconftool-2 --set /apps/nautilus/desktop/network_icon_visible --type bool 1
##可以看到桌面的垃圾桶圖示
gconftool-2 --set /apps/nautilus/desktop/trash_icon_visible --type bool 1
##可以在桌面看到掛載的外接硬碟、光碟、隨身碟等等
gconftool-2 --set /apps/nautilus/desktop/volumes_visible --type bool 1
##可以看到桌面的個人資料夾圖示
gconftool-2 --set /apps/nautilus/desktop/home_icon_visible --type bool 1
##可以看到桌面的我的電腦圖示
gconftool-2 --set /apps/nautilus/desktop/computer_icon_visible --type bool 1
|
|
|
【遠端桌面(系統預設(VINO) / VNC4SERVER)】
使用 系統預設 來啟動遠端桌面
【系統】→【偏好管理】→【遠端桌面】
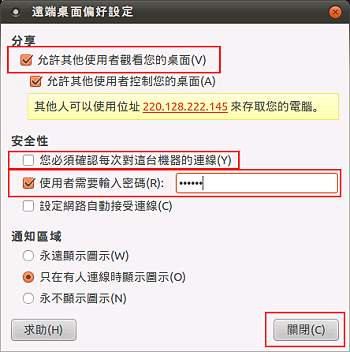
連接的通訊埠是:IP:5900
使用 VNC4SERVER 來啟動遠端桌面
安裝 vnc4server
water@waterubuntu11:~$ sudo apt-get install vnc4server
設定 vnc server 密碼
water@waterubuntu11:~$ vnc4server
You will require a password to access your desktops.
Password:
Verify:
New 'waterubuntu11:1 (water)' desktop is waterubuntu11:1
Creating default startup script /home/water/.vnc/xstartup
Starting applications specified in /home/water/.vnc/xstartup
Log file is /home/water/.vnc/waterubuntu11:1.log
設定 root VNC Server 密碼
water@waterubuntu11:~$ sudo vncpasswd /root/.vncpasswd
編輯 xstartup
water@waterubuntu11:~$ vi .vnc/xstartup
註:如果有多重 VNC Server 記得到每個 帳號的家目錄更改 xstartup
# Uncomment the following two lines for normal desktop:
# 拿調前面兩行的 #
# 後面四行前面補上 #
unset SESSION_MANAGER
exec /etc/X11/xinit/xinitrc
[ -x /etc/vnc/xstartup ] && exec /etc/vnc/xstartup
[ -r $HOME/.Xresources ] && xrdb $HOME/.Xresources
#xsetroot -solid grey
#vncconfig -iconic &
#x-terminal-emulator -geometry 80x24+10+10 -ls -title "$VNCDESKTOP Desktop"
&
#x-window-manager &
|
修改 /etc/X11/xinit/xinitrc 權限
~# chmod 755 /etc/X11/xinit/xinitrc
停用服務
~# vncserver -kill :1
重新啟動服務
~# vncserver
更換解析度
~# vncserver -geometry 1024x768
連接的通訊埠是:IP:5901
使用服務(Service)方式啟動 VNC4SERVER
安裝 xinetd
~$ sudo apt-get install xinetd
修改 /etc/X11/xinit/xinitrc 檔案的讀取權限
~$ sudo chmod 755 /etc/X11/xinit/xinitrc
編輯 Xvnc
sudo vi /etc/xinetd.d/Xvnc
service Xvnc
{
type = UNLISTED
disable = no
socket_type = stream
protocol = tcp
wait = yes
user = root
server = /usr/bin/Xvnc
server_args = -inetd :1 -query localhost -geometry 1024x768 -depth 16 -once -fp
/usr/share/X11/fonts/misc -DisconnectClients=0 -NeverShared passwordFile=/root/.vncpasswd
port = 5901
}
|
sudo /etc/init.d/xinetd stop
sudo killall Xvnc
sudo /etc/init.d/xinetd start
|
|
|
【網路芳鄰檔案分享(Samba)】
安裝 Samba
~$ sudo apt-get install samba
修改 smb.conf 參考此篇
http://www.cas.idv.tw/Documents/Linux/CentOS/CentOS5Install.asp#SambaServer
[user]
comment = My Share Folder
path = /home/user
read only = no
force create mode = 0755
|
停止 Samba
~$ sudo service smbd stop
啟動 Samba
~$ sudo service smbd start
|
|
|
【網頁伺服器 Apache2】
安裝 Apache2
~$ sudo apt-get install apache2
設定參考
http://www.cas.idv.tw/Documents/Linux/CentOS/CentOS5Install.asp#ApacheServer
|
|
|
【遠端連線伺服器 SSH】
使用 openSSH Server 來啟動遠端連線伺服器
~$ sudo apt-get install openssh-server
更改 SSH Port
~$ sudo vi /etc/ssh/sshd_config
# What ports, IPs and protocols we listen for
Port 22
#Root 是否能 Login 預設是 Yes
PermitRootLogin yes
|
|
|
|
【Ubuntu 】
|
|
|
【Ubuntu 】
|
|
|
【Ubuntu 】
|
|
|
|
|
|
|
|
OSWikiHK∣使用 Ubuntu 作為伺服器:http://wiki.debian.org.hk/w/Use_Ubuntu_as_server
OSWikiHK∣Ubuntu Desktop 安裝:http://wiki.debian.org.hk/w/Install_Ubuntu_desktop
泰哥Linux筆記∣Ubuntu Server 安裝桌面:http://blog.lefthander.tw/2010/03/ubuntu-server.html
電腦不難∣Ubuntu 10.10 安裝教學:http://pcnoproblem.twbbs.org/ubuntu-10-10-install/
|
|
|
Ubuntu網絡安裝語法全整理:http://blogold.chinaunix.net/u1/59254/showart.php?id=2442826
Ubuntu 正體中文站∣灌好Ubuntu後必要的修正與套件:疑難排解 |
Ubuntu 11.04 安装后要做的20件事情
http://blog.thinkaway.info/?p=815
Ubuntu作業系統上的軟體懶人包─Lazybuntu @ I.P. zone 痞客邦 PIXNET
http://ipzoner.pixnet.net/blog/post/23108598 |